Python-OpenCVで動画をフレーム分割して画像として保存
動画をフレームに分割して画像として指定したディレクトリーに保存する操作をまとめた。 動画を読み込んで、フレームごとに存在を確認して、確認できれば画像として保存する、という手順。 引数は適宜変えてください。
import os
import shutil
import cv2

def video_2_frames(video_file='./IMG_2140.MOV', image_dir='./image_dir/', image_file='img_%s.png'):
    # Delete the entire directory tree if it exists.
    if os.path.exists(image_dir):
        shutil.rmtree(image_dir)

    # Make the directory if it doesn't exist.
    if not os.path.exists(image_dir):
        os.makedirs(image_dir)

    # Video to frames
    i = 0
    cap = cv2.VideoCapture(video_file)
    while(cap.isOpened()):
        flag, frame = cap.read()  # Capture frame-by-frame
        if flag == False:  # Is a frame left?
            break
        cv2.imwrite(image_dir+image_file % str(i).zfill(6), frame)  # Save a frame
        print('Save', image_dir+image_file % str(i).zfill(6))
        i += 1

    cap.release()  # When everything done, release the capture
githubに置いたコードを 以下のように実行すると、指定したディレクトリーに動画をフレーム分割した画像が保存される。
>>> import test
>>> test.video_2_frames()
Save ./image_dir/img_000000.png
Save ./image_dir/img_000001.png
Save ./image_dir/img_000002.png
...
参考文献
Pythonでディレクトリーの削除と作成
処理中、一時的にディレクトリーを作ることが多いので、以下に操作をまとめた。 引数にディレクトリーパスを渡して、ある時は削除して、ない時は作るという仕様。
# coding: utf-8

import os
import shutil

def delete_and_make_directory(dir_path='./image_dir/'):
    # Delete the entire directory tree if it exists.
    if os.path.exists(dir_path):
        shutil.rmtree(dir_path)

    # Make the directory if it doesn't exist.
    if not os.path.exists(dir_path):
        os.makedirs(dir_path)
githubに置いたコードを 以下のように実行すると、test.pyと同じ階層に新しいディレクトリ-が作成される。
>>> import test
>>> test.delete_and_make_directory()
参考文献
TensorFlowからKerasに乗り換えてみた
モデル設計などの際に、TensorFlowのコードが長くなるので自分でラッパーを書いていたのだが、 ざっとKerasを調べてみたら、ラッパーが必要ないくらいシンプルに書けるし、 前処理などモデル設計以外のツールも充実しているようだったので、 KerasでCIFAR10のモデルを訓練するコードを書いてみた。 なおKerasについては、KerasでCIFAR-10の一般物体認識 - 人工知能に関する断創録 が非常に分かりやすかった。そのため以下に示すコードは、こちらの記事をベースに色々とカスタマイズしている。 なおKeras v1.2.2, tensorflow-gpu v1.0.0, opencv-python v3.2.0を使用しており、 全コードはここで公開している。
パラメーター
IDG_PARAMはData Augmentationのパラメーター。
今回は、ZCA Whiteningと、ランダムで上下左右の移動と左右反転を行う。
これだけのData Augmentationを、独自に実装することなく、パラメーター操作だけで色々と試せるのがKerasの良いところ。
Kerasによるデータ拡張 - 人工知能に関する断創録
に各パラメーターを可視化した様子が掲載されている。
モデルなどの訓練結果はDIRに保存する。最後にFILEが付いてるパラメーターがそれらのファイル。
N_CLASS = 10
N_EPOCH = 50  # 100
BATCH_SIZE = 128
INPUT_DIM = (32, 32, 3)
DATA_AUGMENTATION = True
IDG_PARAM = {'featurewise_center': False,
             'samplewise_center': False,
             'featurewise_std_normalization': False,
             'samplewise_std_normalization': False,
             'zca_whitening': True,  # False
             'rotation_range': 0.,
             'width_shift_range': 0.1, # 0.,
             'height_shift_range': 0.1, # 0.,
             'shear_range': 0.,
             'zoom_range': 0.,
             'channel_shift_range': 0.,
             'fill_mode': 'nearest',
             'cval': 0.,
             'horizontal_flip': True,
             'vertical_flip': False,
             'rescale': None,
             'preprocessing_function': None
}

DIR = '../result/'
MODEL_FILE = 'model.json'
WEIGHT_FILE = 'weights.h5'
HISTORY_DATA_FILE = 'history.csv'
HISTORY_IMAGE_FILE = 'history.jpg'
PARAM_EVAL_FILE = 'param_eval.csv'
メイン
今回実装したのは、データ取得、モデル設計、モデル訓練、結果保存、モデル試験の5つ。 これらをメソッドに分けて、すべてTestクラスのmainメソッドから呼び出す。
class Test:
    def __init__(self):
        pass


    def main(self):
        # Training
        start = time.clock()

        data = self.get_data()  # データ取得
        model = self.design_model(data[0])  # モデル設計
        result = self.train_model(data, model)  # モデル訓練
        self.save(result)  # 結果保存

        print('Training Time: %s min' % round((time.clock()-start)/60., 1))
        print('')

        # Test
        self.test_model(data)  # モデル試験
データ取得
cifar10.load_data()を実行するだけで、CIFAR10を訓練/試験、データ/ラベルに分割して取得可能。
ただし、normalizeとonehot化は自分で行う必要があるが、後者もまたnp_utils.to_categorical()を実行するだけでOK。
def get_data(self):
    # Load CIFAR-10
    (X_train, y_train), (X_test, y_test) = cifar10.load_data()
    self.__draw_sample_images(X_train, y_train)

    # Normalize data
    X_train = X_train.astype('float32')
    X_test = X_test.astype('float32')
    X_train /= 255.0
    X_test /= 255.0

    # Onehot label
    Y_train = np_utils.to_categorical(y_train, N_CLASS)
    Y_test = np_utils.to_categorical(y_test, N_CLASS)

    print('X_train.shape:', X_train.shape, 'Y_train.shape:', Y_train.shape)
    print('X_test.shape:', X_test.shape, 'Y_test.shape:', Y_test.shape)

    return X_train, Y_train, X_test, Y_test
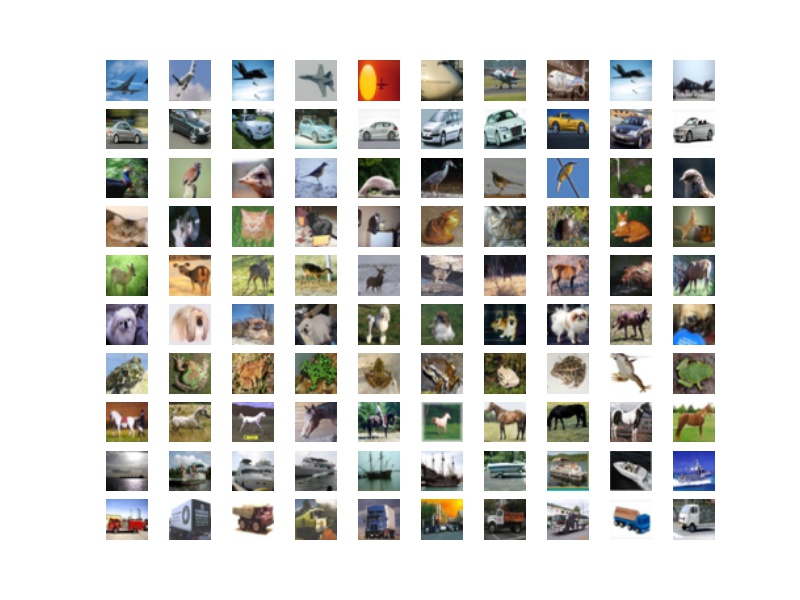
なお、self.__draw_sample_images(X_train, y_train)でCIFAR10の一部を可視化している。

モデル設計
VGGっぽいモデルを設計。
Convolution2Dではborder_mode='same'にしてゼロパディング。
個人的にKerasの気に入っているところはActivation('relu')の部分。
活性化関数を文字列で指定できるところがいい。
TensorFlowでは活性化関数別にメソッドが用意されてたので、独自にラッパーを書いてた。
このモデルは、model.summay()により標準出力できる。
def design_model(self, X_train):
    # Initialize
    model = Sequential()

    # (Conv -> Relu) * 2 -> Pool -> Dropout
    model.add(Convolution2D(32, 3, 3, border_mode='same', input_shape=X_train.shape[1:]))
    model.add(Activation('relu'))
    model.add(Convolution2D(32, 3, 3, border_mode='same'))
    model.add(Activation('relu'))
    model.add(MaxPooling2D(pool_size=(2, 2)))
    model.add(Dropout(0.25))

    # (Conv -> Relu) * 2 -> Pool -> Dropout
    model.add(Convolution2D(64, 3, 3, border_mode='same'))
    model.add(Activation('relu'))
    model.add(Convolution2D(64, 3, 3, border_mode='same'))
    model.add(Activation('relu'))
    model.add(MaxPooling2D(pool_size=(2, 2)))
    model.add(Dropout(0.25))

    # Flatten
    model.add(Flatten())  # 6*6*64

    # FC -> Relu -> Dropout
    model.add(Dense(512))
    model.add(Activation('relu'))
    model.add(Dropout(0.5))

    # FC -> Softmax
    model.add(Dense(N_CLASS))
    model.add(Activation('softmax'))

    model.compile(loss='categorical_crossentropy',
                  optimizer='adam',
                  metrics=['accuracy'])

    # Output model summary
    model.summary()

    return model
以下がモデルの標準出力の様子。
____________________________________________________________________________________________________
Layer (type)                     Output Shape          Param #     Connected to
====================================================================================================
convolution2d_1 (Convolution2D)  (None, 32, 32, 32)    896         convolution2d_input_1[0][0]
____________________________________________________________________________________________________
activation_1 (Activation)        (None, 32, 32, 32)    0           convolution2d_1[0][0]
____________________________________________________________________________________________________
convolution2d_2 (Convolution2D)  (None, 32, 32, 32)    9248        activation_1[0][0]
____________________________________________________________________________________________________
activation_2 (Activation)        (None, 32, 32, 32)    0           convolution2d_2[0][0]
____________________________________________________________________________________________________
maxpooling2d_1 (MaxPooling2D)    (None, 16, 16, 32)    0           activation_2[0][0]
____________________________________________________________________________________________________
dropout_1 (Dropout)              (None, 16, 16, 32)    0           maxpooling2d_1[0][0]
____________________________________________________________________________________________________
convolution2d_3 (Convolution2D)  (None, 16, 16, 64)    18496       dropout_1[0][0]
____________________________________________________________________________________________________
activation_3 (Activation)        (None, 16, 16, 64)    0           convolution2d_3[0][0]
____________________________________________________________________________________________________
convolution2d_4 (Convolution2D)  (None, 16, 16, 64)    36928       activation_3[0][0]
____________________________________________________________________________________________________
activation_4 (Activation)        (None, 16, 16, 64)    0           convolution2d_4[0][0]
____________________________________________________________________________________________________
maxpooling2d_2 (MaxPooling2D)    (None, 8, 8, 64)      0           activation_4[0][0]
____________________________________________________________________________________________________
dropout_2 (Dropout)              (None, 8, 8, 64)      0           maxpooling2d_2[0][0]
____________________________________________________________________________________________________
flatten_1 (Flatten)              (None, 4096)          0           dropout_2[0][0]
____________________________________________________________________________________________________
dense_1 (Dense)                  (None, 512)           2097664     flatten_1[0][0]
____________________________________________________________________________________________________
activation_5 (Activation)        (None, 512)           0           dense_1[0][0]
____________________________________________________________________________________________________
dropout_3 (Dropout)              (None, 512)           0           activation_5[0][0]
____________________________________________________________________________________________________
dense_2 (Dense)                  (None, 10)            5130        dropout_3[0][0]
____________________________________________________________________________________________________
activation_6 (Activation)        (None, 10)            0           dense_2[0][0]
====================================================================================================
Total params: 2,168,362
Trainable params: 2,168,362
Non-trainable params: 0
____________________________________________________________________________________________________
モデル訓練
Data augmentationを行うか否かで場合分け。 行う場合は、上記で設定したIDG_PARAMがセットされる。 ZCA Whiteningは訓練/試験共に実施される。
def train_model(self, data, model):
    X_train, Y_train, X_test, Y_test = data

    if not DATA_AUGMENTATION:
        print('Not using data augmentation')

        # Train the model
        history = model.fit(X_train, Y_train,
                            batch_size=BATCH_SIZE,
                            nb_epoch=N_EPOCH,
                            verbose=1,
                            validation_data=(X_test, Y_test),
                            shuffle=True)
    else:
        print('Using real-time data augmentation')

        # Make a generator for training data
        train_datagen = ImageDataGenerator(featurewise_center=IDG_PARAM['featurewise_center'],
                                           samplewise_center=IDG_PARAM['samplewise_center'],
                                           featurewise_std_normalization=IDG_PARAM['featurewise_std_normalization'],
                                           samplewise_std_normalization=IDG_PARAM['samplewise_std_normalization'],
                                           zca_whitening=IDG_PARAM['zca_whitening'],
                                           rotation_range=IDG_PARAM['rotation_range'],
                                           width_shift_range=IDG_PARAM['width_shift_range'],
                                           height_shift_range=IDG_PARAM['height_shift_range'],
                                           shear_range=IDG_PARAM['shear_range'],
                                           zoom_range=IDG_PARAM['zoom_range'],
                                           channel_shift_range=IDG_PARAM['channel_shift_range'],
                                           fill_mode=IDG_PARAM['fill_mode'],
                                           cval=IDG_PARAM['cval'],
                                           horizontal_flip=IDG_PARAM['horizontal_flip'],
                                           vertical_flip=IDG_PARAM['vertical_flip'],
                                           rescale=IDG_PARAM['rescale'],
                                           preprocessing_function=IDG_PARAM['preprocessing_function'])
        train_datagen.fit(X_train)
        train_generator = train_datagen.flow(X_train, Y_train, batch_size=BATCH_SIZE)

        # Make a generator for test data
        test_datagen = ImageDataGenerator(zca_whitening=IDG_PARAM['zca_whitening'])
        test_datagen.fit(X_test)
        test_generator = test_datagen.flow(X_test, Y_test)

        # Train the model
        history = model.fit_generator(train_generator,
                                      samples_per_epoch=X_train.shape[0],
                                      nb_epoch=N_EPOCH,
                                      validation_data=test_generator,
                                      nb_val_samples=X_test.shape[0])

        # Evaluate the model
        if not DATA_AUGMENTATION:
            loss, acc = model.evaluate(X_test, Y_test, verbose=0)
        else:
            loss, acc = model.evaluate_generator(test_generator, val_samples=X_test.shape[0])

        print('Test loss: %s, Test acc: %s' % (loss, acc))

    result = {'model': model, 'history': history, 'loss': loss, 'acc': acc}

    return result
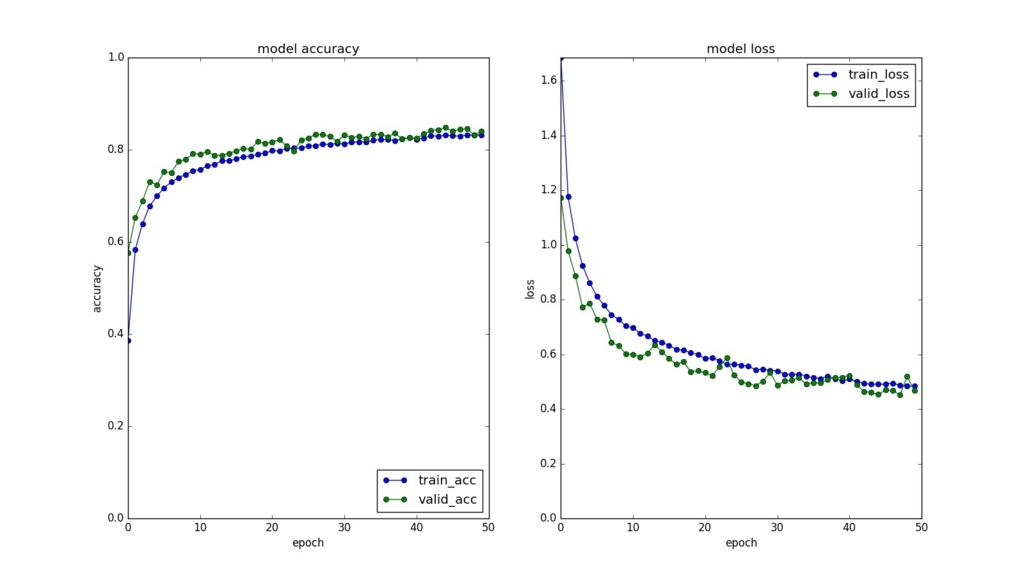
なお訓練中は、以下のように学習状況を標準出力してくれる。 プログレスバーに加えて、訓練/検証別にエラー率と精度が出力されるので、 適切に学習できているかが分かる。
Using real-time data augmentation
Epoch 1/50
50000/50000 [==============================] - 106s - loss: 1.6846 - acc: 0.3863 - val_loss: 1.1716 - val_acc: 0.5766
Epoch 2/50
50000/50000 [==============================] - 108s - loss: 1.1772 - acc: 0.5828 - val_loss: 0.9773 - val_acc: 0.6528
Epoch 3/50
50000/50000 [==============================] - 107s - loss: 1.0237 - acc: 0.6394 - val_loss: 0.8878 - val_acc: 0.6886
...
Epoch 48/50
50000/50000 [==============================] - 107s - loss: 0.4872 - acc: 0.8319 - val_loss: 0.4522 - val_acc: 0.8453
Epoch 49/50
50000/50000 [==============================] - 105s - loss: 0.4835 - acc: 0.8315 - val_loss: 0.5183 - val_acc: 0.8318
Epoch 50/50
50000/50000 [==============================] - 104s - loss: 0.4835 - acc: 0.8322 - val_loss: 0.4671 - val_acc: 0.8403
Test loss: 0.456553607655, Test acc: 0.8476
結果保存
モデル、重み、訓練/検証別のエラー率と精度、Data augmentationなどパラメーターと試験結果を保存する。 最後のはパラメーターによって試験結果がどのように変化するかを調査するためのログとなる。
def save(self, result):
    """
  Save model, weight, history, parameter and evaluation
  """
    model = result['model']
    history = result['history']
    loss = result['loss']
    acc = result['acc']

    # Model
    model_json = model.to_json()

    # Weight
    with open(os.path.join(DIR, MODEL_FILE), 'w') as json_file:
        json_file.write(model_json)
    model.save_weights(os.path.join(DIR, WEIGHT_FILE))

    # History
    self.__save_history(history)
    self.__plot_history(history)

    # Param and evaluation
    dic = IDG_PARAM
    dic.update({'n_epoch': N_EPOCH, 'batch_size': BATCH_SIZE, 'loss': loss, 'acc': acc})
    if os.path.exists(DIR+PARAM_EVAL_FILE):
        df = pd.read_csv(DIR+PARAM_EVAL_FILE)
        df = pd.concat([df, pd.DataFrame([dic])])
    else:
        df = pd.DataFrame([dic])
    df.to_csv(DIR+PARAM_EVAL_FILE, index=False)
以下は保存したhistory.jpg。

モデル試験
上記で保存したモデルとその重みを読み込んで、テストデータにかける。
def test_model(self, data):
    X_train, Y_train, X_test, Y_test = data

    model_file = os.path.join(DIR, MODEL_FILE)
    weight_file = os.path.join(DIR, WEIGHT_FILE)

    with open(model_file, 'r') as fp:
        model = model_from_json(fp.read())
    model.load_weights(weight_file)
    model.compile(optimizer='adam', loss='categorical_crossentropy', metrics=['accuracy'])

    if not DATA_AUGMENTATION:
        loss, acc = model.evaluate(X_test, Y_test, verbose=0)
    else:
        # Make a generator for test data
        test_datagen = ImageDataGenerator(zca_whitening=True)
        test_datagen.fit(X_test)
        test_generator = test_datagen.flow(X_test, Y_test)

        loss, acc = model.evaluate_generator(test_generator, val_samples=X_test.shape[0])

    print('Test loss: %s, Test acc: %s' % (loss, acc))
    print('')
結果はモデル訓練の時とほぼ一致している。
Test loss: 0.460079106236, Test acc: 0.8441
最後に
Kerasのツールの便利さが身に染みた。 他のKerasで実装されたコードを読んでると、 最も精度が高かった重みを上書きしない設定など、 他にも色々な便利ツールがあるっぽいので、 必要な処理を自前で書く前にKerasから探すのもいいと思う。
参考文献
PythonでData Augmentation
Pythonで画像の左右反転、回転、拡大を行ってみた。 Data Augmentationに使えるかなと。

左右反転
scikit-imageだけで実現したかったのだが、APIを見つけられなかったのでOpenCVで実装。 でも3つの処理の中で最も簡単に書けた。 ちなみに第2引数を1ではなく0にすると上下反転になる。
# flip
img_fliped = cv2.flip(img, 1)
回転
angleには角度(°)を指定。 resizeがFalseの場合は、そのまま回転。Trueにすると元画像の画像の角が隠れないようになる。 centerをNoneにすると、中央を原点にして回転。
# rotatate
img_rotated = skimage.transform.rotate(img, angle=10, resize=False, center=None)
拡大
目的の処理が行えるシンプルなAPIがなかったので、AffineTransform()を使用。 rateがプラスの倍率。0.2の場合は20%拡大。scaleには1-rateを指定する形となる。 拡大は左上を原点にして行われるので、元画像の中央が拡大後も中央になるようにtranslationで修正。 具体的には拡大した大きさの半分だけ左上に平行移動している。
# expand
rate = 0.2
size = img.shape[0]
matrix_expanded = skimage.transform.AffineTransform(scale=(1-rate, 1-rate), translation=(size*rate/2, size*rate/2))
img_expanded = skimage.transform.warp(img, matrix_expanded)
実行
記事のトップ画像を表示するためのコードは以下の通り。
# coding: utf-8

import numpy as np
import cv2
import matplotlib.pyplot as plt
import skimage
from skimage import io
from skimage import transform

DIR = '../data/'

class Data:
    def test(self):
        # read Lenna image
        img_raw = skimage.io.imread(DIR+'lenna.jpg')

        # resize
        #img = skimage.transform.resize(img_raw, (32, 32))
        img = img_raw

        # flip
        img_fliped = cv2.flip(img, 1)

        # rotatate
        img_rotated = skimage.transform.rotate(img, angle=10, resize=False, center=None)

        # expand
        rate = 0.2
        size = img.shape[0]
        matrix_expanded = skimage.transform.AffineTransform(scale=(1-rate, 1-rate), translation=(size*rate/2, size*rate/2))
        img_expanded = skimage.transform.warp(img, matrix_expanded)

        # white background
        fig = plt.figure()
        fig.patch.set_facecolor('white')

        # display images
        plt.subplot(141)
        plt.title('raw')
        plt.imshow(img)

        plt.subplot(142)
        plt.title('flip')
        plt.imshow(img_fliped)

        plt.subplot(143)
        plt.title('rotate')
        plt.imshow(img_rotated)

        plt.subplot(144)
        plt.title('expand')
        plt.imshow(img_expanded)

        plt.show()
参考文献
scikit-imageを使った画像の平行移動
scikit-imageという便利なライブラリーを見つけた。 画像の平行移動が2行で実装できたので、以下に示す。
import skimage as ski
from skimage import io
from skimage.transform import rescale

def test(self):
    # Lennaさんの画像を読み込み
    img_raw = ski.io.imread(DIR+'lenna.jpg')
    # 512x512から32x32にリスケール
    img = ski.transform.rescale(img_raw, 32/512)
    # 左に3ピクセル、上に5ピクセルだけ平行移動
    matrix_trans = ski.transform.AffineTransform(translation=(3,5))
    img_trans = ski.transform.warp(img, matrix_trans)

    # 画像確認用の背景を白に
    fig = plt.figure()
    fig.patch.set_facecolor('white')

    # 元画像、リスケール画像、平行移動画像を横一列に標示
    plt.subplot(331)
    plt.imshow(img_raw)
    plt.subplot(332)
    plt.imshow(img)
    plt.subplot(333)
    plt.imshow(img_trans)
    plt.show()
画像標示結果は以下の通り。

scikit-imageを使うためには、import skimage as skiだけで済むはずなのだが、ioとかrescaleは別にimportしないとエラーが出るので、原因を調査中。
またWindows環境だと、PowerShellでコードを実行した際に、画像の表示にio.imshow()が使えないため、上記のようにmatplotlibを利用している。
ただ、画像の回転や拡大にも簡単に行えるようなので、OpenCVとNumPyの組み合わせよりも、Data Augmentationが簡単に実装できそうである。
参考文献
損失関数がNaNになる問題
TensorFlowでDeep Learningを実行している途中で、損失関数がNaNになる問題が発生した。
Epoch:  10,  Train Loss: 85.6908,   Train Accuracy: 0.996,      Test Error: 90.7068,  Test Accuracy: 0.985238
Epoch:  20,  Train Loss: 42.9642,   Train Accuracy: 0.998286,   Test Error: 121.561,  Test Accuracy: 0.98619
Epoch:  30,  Train Loss: 0.945895,  Train Accuracy: 1.0,        Test Error: 102.041,  Test Accuracy: 0.990476
Epoch:  40,  Train Loss: nan,       Train Accuracy: 0.101429,   Test Error: nan,      Test Accuracy: 0.1
Epoch:  50,  Train Loss: nan,       Train Accuracy: 0.0941429,  Test Error: nan,      Test Accuracy: 0.1
Epoch:  60,  Train Loss: nan,       Train Accuracy: 0.0968571,  Test Error: nan,      Test Accuracy: 0.1
Epoch:  70,  Train Loss: nan,       Train Accuracy: 0.0881429,  Test Error: nan,      Test Accuracy: 0.1
Epoch:  80,  Train Loss: nan,       Train Accuracy: 0.0931429,  Test Error: nan,      Test Accuracy: 0.1
Epoch:  90,  Train Loss: nan,       Train Accuracy: 0.0997143,  Test Error: nan,      Test Accuracy: 0.1
Epoch: 100,  Train Loss: nan,       Train Accuracy: 0.0997143,  Test Error: nan,      Test Accuracy: 0.1
原因は、損失関数に指定している交差エントロピーのtf.log(Y)にあった。
cross_entropy = -tf.reduce_sum(Y_*tf.log(Y))
tf.log(Y)はln(x)(自然対数のlog)であり、xが0になるとき-∞になるため、NaNとなっていた。

ゼロから作るDeep Learning ―Pythonで学ぶディープラーニングの理論と実装では、4章の「ニューラルネットワークの学習」で、 極少の数値を加算することで、この問題に対処する方法を提示している。
def cross_entropy_error(y, t):
    delta = 1e-7
    return -np.sum(t * np.log(y + delta))
しかし、TensorFlowを利用したいので、上記の問題を解決しているsoftmax_cross_entropy_with_logits()を用いて、
cross_entropyを書き換える。
#cross_entropy = -tf.reduce_sum(Y_*tf.log(Y))
cross_entropy = tf.reduce_mean(tf.nn.softmax_cross_entropy_with_logits(Y, Y_))
これにより、NaNになる問題が解決できた。
しかし、学習が進み、cross_entropyが低くなるに連れて、Yは1に近づき、tf.log(Y)は0に近づくため、
cross_entropyがNaNになる確率は低くなるはずなのだが、NaNになる点は謎のままである。
Epoch:  10,  Train Error: 1.46717,  Train Accuracy: 0.995,     Test Error: 1.47448,   Test Accuracy: 0.987619
Epoch:  20,  Train Error: 1.46428,  Train Accuracy: 0.997286,  Test Error: 1.47456,   Test Accuracy: 0.985714
Epoch:  30,  Train Error: 1.46262,  Train Accuracy: 0.998715,  Test Error: 1.47142,   Test Accuracy: 0.990476
Epoch:  40,  Train Error: 1.46272,  Train Accuracy: 0.998429,  Test Error: 1.47249,   Test Accuracy: 0.989047
Epoch:  50,  Train Error: 1.46235,  Train Accuracy: 0.998857,  Test Error: 1.47399,   Test Accuracy: 0.987619
Epoch:  60,  Train Error: 1.46462,  Train Accuracy: 0.996715,  Test Error: 1.47435,   Test Accuracy: 0.987619
Epoch:  70,  Train Error: 1.46261,  Train Accuracy: 0.998572,  Test Error: 1.47196,   Test Accuracy: 0.989524
Epoch:  80,  Train Error: 1.46215,  Train Accuracy: 0.999,     Test Error: 1.47119,   Test Accuracy: 0.99
Epoch:  90,  Train Error: 1.46547,  Train Accuracy: 0.995715,  Test Error: 1.4784,    Test Accuracy: 0.982857
Epoch: 100,  Train Error: 1.46201,  Train Accuracy: 0.999143,  Test Error: 1.47057,   Test Accuracy: 0.990476
参考文献
- Why does my TensorFlow Convnet (attempted) training result in NaN gradients?
- ゼロから作るDeep Learning ―Pythonで学ぶディープラーニングの理論と実装

ゼロから作るDeep Learning ―Pythonで学ぶディープラーニングの理論と実装
- 作者: 斎藤康毅
- 出版社/メーカー: オライリージャパン
- 発売日: 2016/09/24
- メディア: 単行本(ソフトカバー)
- この商品を含むブログ (14件) を見る
ResourceExhaustedErrorの原因
TensorFlowで学習していると、訓練データ数が大きい場合、たまにResourceExhaustedErrorが出る。 Windows 10では、以下の内容が表示される。
ResourceExhaustedError (see above for traceback): OOM when allocating tensor with shape[37800,32,28,28]
[[Node: Conv2D = Conv2D[T=DT_FLOAT, data_format="NHWC", padding="SAME", strides=[1, 1, 1, 1],
use_cudnn_on_gpu=true, _device="/job:localhost/replica:0/task:0/gpu:0"](Reshape, Variable/read)]]
注目すべきは[37800,32,28,28]の部分。
順にバッチ数、チャンネル数、画像の縦のピクセル数、画像の横のピクセル数を表している。
これらの積(37800x32x28x28=948326400、単位はbyteではない)がメモリーの許容サイズを超えたためエラーが起きてるのだが、
今回はバッチ数(37800)が大き過ぎることにより、ResourceExhaustedErrorが発生している。
以下のように、僕の環境では、バッチ数(n_batch)は、訓練データ数(n_record)とバッチ率(batch_rate)をかけて決定している。 そのため、訓練データ数が大きい場合は、バッチ率を小さくする必要があったのにしていなかったため、エラーが発生していた。 もしくはバッチ数をエラーが出ない固定値に設定する必要があった。
n_batch = int(n_record*batch_rate)
for start in range(0, n_record, n_batch):
    end = start + n_batch
    sess.run(train_step, feed_dict={X: train_data[start:end], Y_: train_label[start:end]})
TensorFlowのMNISTのチュートリアルでは、 以下のようにバッチ数を50に固定している。 ただし、訓練データ数が少ないMNISTだから50で良いが、訓練データ数が非常に大きいデータの場合は、 学習に時間がかかりすぎる場合がある。 そのため、やはりバッチ率を指定するなどにより、訓練データ数に合わせてバッチ数の調整が必要である。 また、run()だけでなくeval()に渡すバッチ数も調整する必要がある。
for i in range(20000):
    batch = mnist.train.next_batch(50)
    if i % 100 == 0:
        train_accuracy = accuracy.eval(feed_dict={x: batch[0], y_: batch[1], keep_prob: 1.0})
        print("step %d, training accuracy %g" % (i, train_accuracy))
    train_step.run(feed_dict={x: batch[0], y_: batch[1], keep_prob: 0.5})